

How To Draw On Foam Board
I have fully updated this article, which was originally written a few years ago, and I have added some more than illustrations. This form of model-making is, I remember, still proving itself invaluable despite increasing competition from the likes of SketchUp. I'g keeping information technology in the Methods section for the time beingness, though not certain whether it shouldn't go with Technical Drawing.
The following aims to serve equally an introduction to the purposes of the so-called 'white menu model' in film/tv design work, what information technology should include, and the materials one can choose to make it. In the case of the materials and techniques recommended, information technology is really just an overview of possibilities and doesn't go into full, step-by-step teaching on how to build. It is of import to make the distinction right at present between the 'white card model' meant in this case and the other case .. the exploratory, often rough and inexact, sometimes coloured, 'sketch' model which is oftentimes referred to by the aforementioned proper noun, especially in the theatre. The 'white card model' of the present context is, in many ways, annihilation simply crude and inexact and virtually ofttimes, due to its usual place in the chronology of design steps, it is no longer exploratory.
'White menu models' explained
Although the film/tv product designer is gratis to utilize a wide variety of visual ways in developing and recording a prepare blueprint concept, including rough or 'sketch' models during the early stages, the so-chosen 'white carte du jour model' produced for the final stages conforms to very specific requirements. It is usually made one time the pattern has been finalised, most oft incorporating the detailed technical drawings created for the construction of the gear up. Information technology is therefore quite literally a three-dimensional 'design' of the intended blueprint.

Information technology is normally not a realistic, atmospheric rendition of what the set will look like, let alone how it will appear in the film. It may offer no information on colour, little on texture and materials, merely all the most essential information on space, structure, movable elements and their practical implications. The designer may build a version earlier in the pattern procedure to exam the blueprint's three-dimensionality ( to check general proportions, to better visualise filming possibilities etc.) just these things have usually all been worked out by the terminal stage and hither the model made is more than of a communicative device than a 'testing' tool. It serves as a communication to the whole picture crew. Information technology tells the director and the cinematographer exactly how much space at that place is for any action is required for a scene but also gives a summary thought of what will exist seen behind information technology (this supports the value of creating technical drawings/model with some graphic indication of surface textures etc.). In improver it tells the cinematographer, and camera, audio or lighting crews, how much infinite there will be for equipment and whether whatsoever obstacles such as pillars, steps or levels demand to exist planned for. It gives an overview for the technical coiffure responsible for building and furnishing a set (or modifying an existing ane) of how much work is required. It furnishes the financial administrators with the same overview to assist them appraise the costs.
The most common scale for this model is 1:50 (or the equivalent 1:48 if Imperial ..anxiety and inches.. is used). This is usually the calibration in which the main technical ground-plans are drafted, and it is more often than not accustomed that this is neither too small to show a significant amount of graphic particular nor to appreciate proportion in relation to the human figure. In whatsoever case models in a larger scale i.e.1:25 simply get too large to be manageable. Common types of carte du jour can be used, with the drawings spraymounted to them. These are so cutting out and assembled to form 3D structures. The 'rule' is that anything which has a pregnant physical bearing on the set infinite (such as a pillar, steps, changes in floor level, opening doors, railings etc.) needs to exist represented in 3D whereas annihilation which can be ignored from the signal of view of space (such as shallow ornament or panelling, low-cal curtains etc.) tin be left apartment as drawing. I always recommend that, at ane:50 scale at least, one tin can safely represent about things under 5cm deep (in reality) as apartment drawing. 5cm amounts to a thickness of 1mm in a 1:50 scale model. On the other paw, anything protruding 5cm or more than should be given that physical thickness in the model! For example a sparse modernistic radiator could exist just drawn whereas an older, more 'beefy' blazon really needs to be represented more than physically in 3D (at the very least as a separate cutout which is stuck at the correct distance from the wall to convey the object'south total depth). Another common example is bookshelves, which too actually exercise need to be shown in their proper depth nonetheless 'fiddly' this might seem. This is to ensure that in that location can be no misunderstandings most the verbal spatial limitations of the set, which is of vital importance considering the amount of money in filming-time which such misunderstandings might price.
One exception to the '5cm rule' may be the floor expanse .. and this calls for the personal sentence of the designer/maker. In the case of the flooring, even differences under 5cm could have a huge physical bear upon in terms of moving things effectually, so information technology would make sense to emphasize these physically in the model. It helps even more if the height indications included on the fatigued ground-plan are kept visible .. another good reason for using the bodily basis-program, pasted to the baseboard.
There is always a margin left for personal judgement! Just as in that location is always room for the personal touch, to be a little bit more personal, creative or even .. aesthetic! .. in how one renders ane's ain technical drawings (better still if information technology actually enhances rather than detracts from the communicative clarity of them!) the same should apply to the white card model. Showmanship may not be strictly necessary in practical terms .. but it tin can inspire! Even this kind of model can exist fashionable as well every bit functional and, dependant on individual taste, ability and.. most chiefly.. time, it tin can be embellished with graphic detail, structural finesse or effects designed to 'sell' the visual concept. Even at the later stages of blueprint development it pays to be truly creative with the model, to be inventive with methods of representation or 'simulation'. Such experimentation can directly puddle into what I telephone call our general 'creative matrix' equally designers. I wouldn't say that elements of colour are totally 'banned', only particularly here it is important not to upset the overall residual. Colour can go a distraction, giving visual weight to some elements to the detriment of a counterbalanced overall view.

Above is part of a white bill of fare model made past Edwina Camm for 'An Instance of the Fingerpost' an MA Production Pattern film project at Kingston. Edwina drew her original technical drawings this way .. little needed to be added to create this rich, convincing effect when used for the white card model.
There is another grade of 'white bill of fare model' often used in film which I'd phone call 'virtual' or imaginary .. where a building, structure or even a whole mural is synthetic in precise dimensions even though it will never be physically built in its entirety. These are only as important to the production process considering they brand sense of how the diverse embodiments of the 'set' (whether CGI, built interiors, realistic physical models made for filming) are meant to fit together. I will exist coming back to these later on, simply for the moment we are withal concentrating on white card models for physically built sets.
There at present follows a brusk listing of the well-nigh pregnant individual points worth noting:
The base on which the model is mounted should exist flat and stable i.eastward. secure enough to exist a good back up, not merely when transporting the model but also for resting information technology down even where there are no totally free table-tops available. Product offices are often like this, and certainly studios or locations with sets in progress. Mountboard on its own is never enough! Generally 5mm foamboard will suffice for an A2 size model and 10mm foamboard for A1 and is often a meliorate option than choosing heavier plywood or MDF! Withal if the foamboard is warped (and the cheaper polystyrene core foamboards ofttimes are) this must exist first corrected past business firm bracing on the underside. Some other important extra precaution is protecting the baseboard corners confronting knocks (perhaps simply by gluing triangles of mountboard on the top side). There's nil that transmits an impression of carelessness more than a lot of bashed corners! These may well go inevitable with a 'working', much-carried cardboard model, but simply a little flake of extra strengthening can limit the impairment. One needs a balanced attitude with respect to all this .. on the one hand caring about ane'south professional appearance but on the other accepting that in a heavily populated working environment ane can't remain too 'precious'!

Model in preparation for the build of the Sarang moon-station for the picture show 'Moon' 2009 on Shepperton Studios K-Stage. Often to save time, and if changes are anticipated, the white card model is mainly held together with pins .. unfortunately these models are always falling autonomously! Photo courtesy of Gavin Rothery.
The ground level (at least the visible gear up flooring) should also be represented in white rather than bare woods if this is used. There should be a unity .. or rather, the word is homogeneity .. of colour and treatment throughout the model. Merely it should show very clearly where the floor is 'the set' and where it is not, and so sometimes information technology makes sense for the 'offstage' to be differently coloured. Nigh often the master groundplan is used, spraymounted to the baseboard. If this groundplan is properly done, then (sometimes disregarded) elements such equally scenery seen through windows volition be automatically accounted for in the model. For obvious reasons even minor ground surface elements or slight level changes volition have an impact on how the space can be used, so these demand to be physically represented in the model rather than just fatigued. If yous're lucky, slight changes in level are easy to achieve simply by layering different thicknesses of carte on meridian of the baseboard. If y'all're unlucky and part of the floor sinks below the mutual '0' level, this is another good reason for using something similar 10mm Kapa-line foamboard as a base. The department that sinks tin can exist advisedly cut out (a precision chore with the scalpel), the newspaper tin can exist peeled from the dorsum of information technology and the foam sanded to brand it thinner, and the section can then be glued dorsum where it came from .. at present a little sunk.
There should e'er exist at least 1 scale figure included, just equally a familiar indication of calibration. In my experience, as long every bit the essential proportions are right this effigy should be every bit merely conveyed equally possible and flat cut-out figures often expect better in this context than 3D ones.
Practicals (i.east. working or moving elements) such every bit doors, shutters or removable parts demand to work in the model, or at to the lowest degree be clearly indicated as movable. This should remain within reason ..for example, it is piece of cake enough to half-way cut through card to brand a working door but it would be unreasonable to expect a working roller-blind! In cases like this the simpler shortcut would exist to make the model with the blinds open and make dissever inserts to convey the effect of them down if this is necessary. Even in the simpler example of practical doors it may exist better just to glue them ajar to evidence that they're practical. Having to flip piddling $.25 of cardboard open up in the model just to show that they open seems a chip unnecessary and could fifty-fifty be dangerous to the model if nerves are affecting one's motor-control! It is oft necessary to make parts of the model removable so that, particularly, interiors can be better seen and to have amend photos of these parts. This may directly reflect how the set up will be built for filming in which case the so-called 'floating' walls will be indicated on the groundplan. Ceilings are a chip of a 'grey area' (i.e. often misunderstood) when it comes to the white card model. Strictly speaking if the walls of a studio prepare are going to be congenital to a certain height, even if that extends beyond what the camera will run into, they should exist built to that tiptop in the model. Similarly if a ceiling exists in a used location it should be included, to make it clear where information technology is, even if the camera is going to avoid it. This would then need to be made detachable. When the ceiling becomes a feature of the design information technology should definitely be included, but again detachable.
Windows which are meant to be seen through (or any transparent surfaces) need to allow just that in the model, and demand to be cut out, and also surfaced on the dorsum with thin acetate to brand information technology clear if they are going to be glazed (this for example is something both the lighting and audio crews will demand to consider).
It is a common error to forget that something will be seen through a window, or an open up door. If the gear up design has been conceived and adult largely on the drawing board it may be simply at the 'white bill of fare model' phase that this is fifty-fifty considered! By and then it may be also belatedly for major alterations or to create more infinite for backdrops etc. Digital insertion via blueish or green screen, or fifty-fifty old-way dorsum projection, may solve a number of bug .. but these as well should exist planned for before in the design process. This is even so another solid argument for starting the physical model process early, if only as rough 'sketch' version.

Another example of the illustrative quality of white card models from Edwina Camm, also showing the importance of including the ceiling in this context.
If slender structures just as stair balusters or metallic railings (although spatially apartment) are left as blocked-in drawings they tin create a false impression of space and often completely obscure the effect of the stairs. These are far amend represented equally cut-outs where humanly possible. An effective and often easier culling nevertheless is to draw these structures with permanent ink on acetate sheet (simply the acetate should ideally exist matted to differentiate it from glazing).
In that location should be no short-cuts taken when representing steps, even long, regular flights of them (i.east. sometimes done past representing them as a apartment card incline). This can exist visually confusing. It is understandable because making them tin can be ho-hum, but 'sandwiching' foamboard or bill of fare to form the correct 'riser' (meaning the height of a step) and so simply layering these is one way of making construction much easier.
Should a 'white card model' stay white?
I've written elsewhere that I don't consider pure white carte to exist the right medium at all when it comes to representing, or fifty-fifty just mocking upward spaces. I think that at the very least off-white, beige or light-gray should be used because white is far also glaring .. it bounces the lite inside and effectually it like a pinball and consequently it gives a misleading impression of interior spaces! Only it's different when copies of the technical drawings are pasted to the surfaces .. there is less glare and, dependent on the style of cartoon and the copier settings, often a variety of grey tones.
As I explained earlier, the event should be monotone, rather than particularly white. The model can even be sprayed, as long as this doesn't obscure the definition of the drawings.
SCALES AND SIZES
Since the white card model is commonly a pasted, 3D version of the technical drawings one would assume that these dictate the scale of information technology .. simply this is only partly truthful. Equally I've said 1:50 (or 1:48) is the most practical calibration and the master ground-plans are often drawn in this scale. But the elevations (pregnant the vertical faces of walls, structures etc.) may have to be drawn in a larger scale, such as 1:25, if there is a lot of detail. These drawings therefore have to be converted to 1:50 .. i.e. copied half-size.
Most people with some experience of working with scales would not have to recollect that long to get in at 'half-size', or '50% reduction' when thinking of the conversion from ane:25 to 1:l .. information technology seems obvious. However, what if the elevations have been drawn in 1:20 calibration and need to go 1:50? Less obvious, isn't it? To solve this little mental trouble we take to go back to '1:25 to ane:50' and look at what nosotros might have washed. If we divide 25 into 50 we go 'two' .. if nosotros then divide 2 into 100 we get '50'. That's the percent reduction. So .. 20 into 50 gives us '2.v' and 2.5 into 100 gives united states 'forty' .. and so this time it'southward 40% reduction.
A mutual mix-upward that arises when thinking or talking nigh models is between 'scale' and 'size'. For example, a 1:50 scale model will exist 'smaller' both in scale and concrete size than the aforementioned structure modelled at 1:25 scale but the 1:50 version might sometimes be referred to as a 'larger' model considering it enables a 'larger' area of the real thing to exist modelled. To avert the confusion 1 should brand a addiction of referring to 'smaller' or 'larger' just in terms of scale, i.e. a 'larger' model is ane that is made to a larger calibration even if it ends up a physically smaller portion of the whole. The scale i:20 is a 'larger' scale than 1:25 only many people too get dislocated considering, from the way it is written, it appears a smaller value. Information technology may be a little easier when working with Purple (feet and inches) and referring to 'half- inch' or 'quarter-inch' scales, more obviously decreasing in size.
Past the mode, another misunderstanding often arises when confusing dimension and surface surface area. For example, when asked to double the size of an A4 drawing many might call up 'A4 to A3' but this, although doubling the surface expanse, is non doubling the dimensions. To double the dimensions you need to choose the next size upward, i.due east. A4 to A2.
Even if one has recently completed the technical drawings, before starting a 1:l or a quarter-inch white card model .. or whatever scaled model .. 1 should take a moment to re-acquaint oneself properly with the scale again. I should, for example, await at how small-scale a effigy is (boilerplate male actor 1.75m loftier), how loftier a door might be (average 2m high), but just equally importantly how thick a slice of card is needed to represent 5 or 10cm reasonably accurately.
To a higher place is an illustrative 'sample' of white card model, only made to convey a few of the typical things mentioned above .. and non outwardly expressing any aesthetic! However, information technology is make clean and neat .. in other words the making of it looks cared about. I should never underestimate the importance of this! On the other mitt the white menu model works for a living .. it gets around, it's handled and it gets worn at the edges .. so there's no sense in getting too precious about it.

But, there's nothing to say that the white menu model tin't be dressed with some style! The model above was created by Patrick Scalise while a student at Wimbledon College of Fine art.
VIRTUAL WHITE CARD MODELS
This may seem similar a contradiction in modernistic language but you'll understand, it'southward the best mode of describing actual physical scale models made of buildings, structures or landscapes that are never going to exist in their entirety in existent size .. simply are treated as if they will! If you visit Warner Bros. 'The Making of Harry Potter' you'll see a number of these, aslope other white card models for interiors and other large 'props' that were physically built.
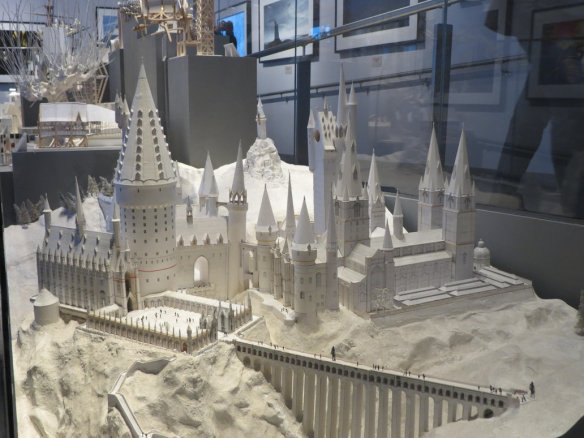
Hogwarts was a very clever, highly complex and meticulously planned creation which brought together CGI, real locations, realistic physical models and full-size builds. This white card model is pivotal in giving the endless people involved a clear and immediate understanding of how each function is meant to go together.
MATERIALS AND TECHNIQUES
Foamboard
White foamboard is 1 of the near common materials used every bit a structural footing for
these models, together with the thinner mountboard. Information technology is light and very easy to cutting, though quality and properties differ widely according to make and price. Its primary advantage is in combining ease of cutting with robustness (i.due east. information technology maintains its straightness while still beingness soft) simply its thickness can also exist a bonus when defining proper walls (e.yard. 5mm at i:50 scale represents 25cm). Information technology is manufactured in 3, five and 10mm thicknesses, though often only the 5mm is stocked in shops. Cheaper foamboards are filled with a relatively coarse-celled polystyrene which doesn't stand up to solvent glues or spray-paints, whereas the foam interior in more expensive brands may exist denser, giving a cleaner, more solid cut edge and perhaps a slightly more than dent-resistant surface. The amend brands will usually accept fifty-fifty PVA wood mucilage quite well for bonding. This is certainly true of the superior polyurethane foam in Kapa-line foamboard which volition accept even solvent glues such as UHU and spraypaints. Kapa-line remains straight even under humidity (other foamboards are often quickly warped) and it has the added advantage that the newspaper layers tin can exist advisedly peeled off, either to facilitate angle into curves or to use the foam on its own as a fabric.
Cutting
When cutting through card with a pocketknife a slightly angled edge is inevitable yet upright one tries to go along the blade. The thicker the foamboard the more than pronounced this can become. This may not always be visible or matter, simply ameliorate right-angled edges are needed when gluing two pieces together to brand a corner. Ane possible fashion of solving this is past cutting just half way through on i side, taking the line advisedly round (i.eastward. with a effort square) to the other side and completing the cut in exactly the same place on this side. If the foam edge is uneven this can be gently sanded using a sanding cake. In fact if 1 tin can use a right-angle sanding block gently enough any foamboard edge can be sanded make clean and directly. The fuzzy burr of paper which develops along both sides can be removed by carefully 'scuffing' with the sanding block at a 45degree angle. Extra care needs to exist taken while working with foamboard non to press down besides firmly while steadying the sail as finger-dents are very like shooting fish in a barrel to get.
Joining
Stiff PVA glue (always better to use the 'wood mucilage' blazon rather than the economy-way 'school' mucilage) will bond foam-to-menu well but not instantly, then joints often have to be temporarily taped together with masking record while setting. 1 should usually allow at least 15 minutes for this. An alternative 'trick' is to insert a few short lengths of double-sided tape along an edge to be glued and so that these hold the bill of fare pieces temporarily but firmly together while the slower glue (alternating in between) is taking upshot. Using a solvent glue such equally UHU may be quicker, but it dissolves the foam in the standard brands and then clean or effective gluing is not e'er guaranteed. Coating any cream edges first with slightly diluted PVA volition solve this and when dry, UHU or sprays can be used on these edges, merely information technology is rather laborious to go to this trouble.
Bending
Whether curved walls need to be made in either foamboard or mountboard the method is similar. The material needs to be cut half-way through in repeated parallel lines (equally petty equally 2mm apart for a tight curve), making it more than flexible. But the grooves only work for bending one way, and so for example an 's' curved wall has to be grooved in alternate positions on both sides for information technology to bend properly into an 's'. The walls can be surfaced with paper to hide the grooves, but the curve must be secured (in the right bend) earlier this is done (if done before it volition stop it from bending) and information technology'southward meliorate to use permanent spraymount otherwise a thin paper covering volition buckle badly.
Other methods include .. if the superior Kapa-line foamboard is used, the paper layer tin be peeled off (either from one or both sides) making it much more bendable without having to score the surface. Peradventure an even easier alternative for achieving curving walls is to utilise a dense cream sheet such as Plastazote, which is spongy and very flexible, or a thin styrene plastic (see beneath).
I have to say that I have mixed feelings nearly the apply of foamboard for these models. On the one mitt a good, robust, polyurethane-cadre foamboard is invaluable as a lightweight baseboard .. simply if a cheap polystyrene-core one is used it is liable to warp badly over time and ends up showing every finger impression! This is besides the problem when using foamboard for wall construction. Information technology has to be handled very carefully, and unless i has taken the problem to do with the material for a while before trying to cut clean edges or door/window openings .. it simply doesn't expect good! It'south true that information technology can be a massive fourth dimension-saver in terms of representing appropriate wall thicknesses, as mentioned before. I would suggest yous utilise it sparingly until you've mastered how to accomplish perfectly clean, straight cuts.
White mountboard
It is essential to have white mountboard (or equivalent white card between 1-2mm thick) i.e white on both sides rather than white/black. Otherwise, the model can get chequered with distracting areas of black. In any case white mountboard tends to be cheaper and some brands are softer to cutting. As with foamboard there are many similar brands of white card with a standard mountboard thickness (c. 1.4mm, or 1400microns equally it'south sometimes written) and these will vary greatly in hardness and quality. Matte is definitely better to choose (in that location are some semi-glossy types), and avert white carte which has a noticeable layering within (a bit like plywood) because this is likely to be the toughest to cut! The aforementioned is true generally of 'greyboard' or recycled grey or dark-brown paper-thin which is difficult and full of gritty particles. Virtually of the softer forms, such as the standard Daler-Rowney mountboard sold in A1 size sheets are fine for perhaps most of the piece of work ..walls or simple cut-outs.. only unsuitable for more delicate structures such as railings for example, because they are too thick in scale and volition intermission apart if cut also sparse.
Cutting
As a general rule when cutting anything by manus with a knife it is always better to take things advisedly and slowly. There is never any advantage in being able to cut right through in 1 go even if that is relatively like shooting fish in a barrel. A straighter, more right-angled and
cleaner cut is almost always achieved by starting carefully with a very low-cal guiding cutting and following through a few times, increasing the pressure gradually. As with all straight cut, it should be done against a flat metal ruler (non-slip, or with masking tape along
the underside to make information technology then) and positioned so that the primary calorie-free source is falling into the cutting edge, so that the marked line is not obscured by shadow. Information technology is surprising how many people who might in other respects be very able with their hands find it quite difficult to cutting a direct, make clean line. From my experience of witnessing people trying to cut a straight line (must be hands in the thousands by at present!) I've come to the conclusion that the problem lies in non properly 'feeling' the straight edge of the ruler plenty to stick with it. It may really be this uncomplicated! The best advice I can requite (apart from the points to a higher place) is to spend a footling time getting acquainted just with what it feels similar to printing the scalpel blade firmly against a metallic edge and move along evenly. It may also help to say that the scalpel bract is 'meant to' bend alittle with the pressure level of beingness pushed against the ruler and that if it doesn't its always liable to wander.
Gluing
White Pva mucilage is always the best and cleanest option when gluing near anything porous, like cardboard. Stiff Pva (a.yard.a forest glue, such as 'Evo-stik wood') invariably gives stronger and cleaner joins and a good quality Pva can be surprisingly quick. When gluing edges the PVA must be used sparingly (and excess wiped off) for the quickest results on card. Particularly if two larger pieces are beingness laminated (i.e. glued surface-to-surface) only spots of glue are needed to hold them firmly in place otherwise the h2o-based glue will cause warping if spread on too liberally.
If .. for whatever reasons of your ain .. you prefer to use UHU, you must be able to command it! Unfortunately the UHU tube nozzle, the consistency of the glue and the way information technology comes out, are non designed for really precise control .. such every bit is needed when trying to use the gum to a sparse edge of menu for example. Some do is needed commencement. One tip is that if you desire UHU to stick firmly more immediately .. almost as superglue does .. you have to utilize the glue and position the piece down as you commonly would, pressing firmly, simply then elevator it upwards again merely a few millimetres. This volition 'string' the glue slightly, and when you printing the piece down again the bail will already be much firmer and will not need supporting.
Thinner white bill of fare
It is essential, if y'all desire to go along in scale, to have recourse to something thinner than mountboard but still strong enough to stand upwardly on its own if demand exist. Information technology also helps if this card doesn't fragment (divide into layers) then hands when finely cut. Usually the sparse white card sold in art shops is not labelled by thickness but according to its weight per square metre. College shops in the UK tend to stock inexpensive sparse white card from the art supply firm Seawhite in 200, 300 or 600gsm weights. The 300gsm is roughly 0.5mm thick and the 600gsm 1mm thick. These are quite strong, simply too suitable for fragile cutting.

The 1/four inch (ane:48) calibration white carte model for 'Boardwalk Empire' not only fully clarified the space only also communicated much of the 'look' due to the inclusion of the signage. Courtesy HBO 'Boardwalk Empire: Designing an Empire'.
Stencil card
This type of card is also known as 'oiled manilla' and is meant for making very fine-cutting stencil shapes. The manilla carte has been impregnated with linseed oil which prevents it from fraying or breaking so hands. This treatment also gives it a slightly waxy composition, making it easier to cut and ensuring a very sharp edge. Although it is past far the all-time for intricate work .. especially to convey repeated balusters, railings, delicate window frameworks etc .. it is not ideal for strictly 'white carte du jour' models because of its warm ochre colour. If used it needs to be covered, sprayed or painted .. unless the whole model becomes a similar colour! Although it contains oil it can be painted with water-based paints or glued using Pva quite easily. It will non warp equally much as other types of card when painted. However, if it is used and needs to be made white I would recommend spraying it first with Simoniz white acrylic primer. This won't eliminate all the colour, just nearly of it, and more chiefly it will seal the surface and then that once the primer is dry later on a few hours, more water-based whitener such equally white acrylic or gesso tin can be applied without the structures warping.
More nigh what'southward doable with oiled manilla can be establish in Working with stencil bill of fare which is under 'constructing' in the Materials department.
Acetate
Thin acetate sheet is the well-nigh available clear plastic to employ for representing window glass. At 1:l-1:20 scale this doesn't need to be very thick and usually the slightly stiffer version of two normally sold as A4/A3 sheets in graphics or copy shops (for writing or printing on to use for overhead projection) will remain flat plenty.
Cutting
Acetate cuts easily with a scalpel simply if need be thicker sheets can be scored and snapped cleanly. If scored lightly then bent on the score line information technology will stay together as corner, which is useful if trying to represent a glass structure without the messiness of having to glue edges. I can't mark on acetate with a normal pencil and then either the shape to exist cutting needs to be drawn on newspaper and used equally a template underneath or the surface covered with masking tape and lines marked out on that.
Gluing
If gluing becomes necessary i.eastward. for attaching to the backs of window frames, minor strips of double-sided tape are much cleaner than gum. Superglue for example volition 'fog' acetate around the area glued while both the 'cement' intended for plastics and UHU tend to be difficult to control. A 3rd culling (but only if gluing acetate to another plastic such as styrene) is the thin plastic solvent available for melt-gluing a range of plastics (e.g. 'Plastic Weld' or 'Extrufix') which has to be brushed onto a joint from outside. This is mostly much cleaner because whatsoever excess solvent volition evaporate
Plastazote
This is a flexible foam (halfway between hard foam and 'cushion' foam) which is available in many thicknesses, densities and colours. Most people will be familiar with the like, brightly coloured 'hobbyfoam' sheets for children which unremarkably range between 1-3mm thickness. The material may likewise exist familiar from exercise or camping ground mats. Although very soft it can be cut quite cleanly with a precipitous scalpel though it can't be sanded. At an advisable thickness information technology can be platonic for curving walls for example, or even for building upwardly a run of curving steps.
Gluing
Plastazote cannot exist glued with Pva and fifty-fifty UHU may not be potent enough. A rubber contact agglutinative such as 'Evo-Stik Impact' volition be needed. This has to be lightly applied to both sides, left for a few minutes and and so pressed together (UHU can sometimes be used as a contact adhesive in the same manner). This has to be washed carefully because at that place is no chance of repositioning. Some brands of this type of foam glue very readily with superglue.
Styrofoam, expanded polystyrene and PU foam
For some structures to be represented it's easier and quicker to make solid blocks rather than having to construct boxes from a canvass cloth. Since white menu models
don't necessarily need to be permanent, these light, easily-worked, and so-called 'rigid' foams may be an option. Styrofoam may be familiar as the light blueish sheets (although styrofoam comes in other colours according to unlike grades or densities) made for wall insulation and commonly used in theatre and movie workshops as a rapid etching material. Styrofoam is very finely-celled and so it sands very well without crumbling .. using a sanding cake it's possible to get smooth, sharp-edged shapes fairly easily. But styrofoam is of item benefit for achieving curved, streamlined or organic forms. Regular acrylic or acrylic gesso are best to use for painting information technology white, since spray paints will dissolve the surface. For more on how to shape styrofoam, including concave likewise as convex forms, see my article Shaping styrofoam under 'shaping' in the Materials section.
Expanded polystyrene is basically the same substance just formed differently and the cells are much larger. This is made only in white and volition be most familiar as hardware packaging material and ceiling tiles etc. This common 'expanded polystyrene' is ofttimes shortened to 'EPS' whereas styrofoam is officially 'XPS' meaning extruded polystyrene.
Polyurethane foam .. oftentimes referred to as 'PU cream' .. is unremarkably found in white or beige, and is often a harder, denser rigid canvass foam than the others. It will resist the solvents in glues and spray-paints, though these will however work well to bond or cover it. Rigid PU cream is mainly available from suppliers of resins and fibreglass materials. But, nearer to abode perhaps, some regular foamboards are made with a polyurethane core rather than polystyrene and the paper coverings are easy to peel off cleanly to employ the smooth foam as a constructional or shaping material. Examples are Kapa-line foamboard and London Graphic Centre'south Premier Polyboard.
Cut
These foams are very easy to cut with a knife (or hot wire cutter, except PU foam) and both styrofoam and PU foam can exist sanded effortlessly to a shine, sharp finish fifty-fifty for very small-scale forms. This is not the case with polystyrene because of its much larger cell structure. These tend to interruption upward or can't be sanded down below a certain size. All tin can be cut on a band saw, simply failing this the best style to ensure a straight cutting right through is (as with thick foamboard) to start cutting one-half mode through on one side, take the line round and consummate from the other side. Neither a scalpel nor Stanley pocketknife will get very deep so often a abrupt penknife, fruit pocketknife or serrated breadstuff knife volition serve ameliorate. The crude edge produced tin can easily be sanded smooth with coarse sandpaper on a sanding cake.
Gluing
Whereas PU foam is not affected by solvents and can be glued quite effectively with UHU, contact adhesives or fifty-fifty superglue, styrofoam and polystyrene require special 'foam friendly' glues such as 'UHU Por' or solvent free (I recently found that Gorilla Mucilage volition also work very well since information technology is polyurethane). Strong Pva wood glue should piece of work with all though takes a lot longer to gear up. Often it is much easier to tack cream pieces together with double-sided tape which, if pressed together hard plenty, volition oft hold just besides as gluing. Another form of gum which styrofoam seems to take is spraymount, particularly constructive if sprayed lightly on both surfaces like a contact adhesive.
Foamed Pvc and styrene
Although foamed Pvc sheet is not so easily obtainable (at least not from art shops) information technology has excellent backdrop, being somewhat easier to cutting than even some forms of carte du jour while remaining much more than durable and resistant to warping. The thinnest guess (1mm) is platonic for frail cut-outs such as windows and railings. The best make of foamed Pvc for this kind of work is 'Palight', which is one of the smoothest and softest to cut ( or the similar 'Palfoam' which is even softer and supposed to exist cheaper). Unremarkably the minimum quantity one can order is an 8x4ft canvas (1220x2440mm) which can be quickly delivered, but if one accepts this the cost of 1mm or 2mm Palight can work out cheaper than most forms of cardboard. A practiced online source for ordering/delivery is Bay Plastics www.plasticstockist.com (the 1-2mm white foamed Pvc included in the online catalogue is the cheaper 'Palfoam' rather than Palight). Recently though the 4D modelshop in London take started stocking 1mm and 2mm Palight in small (300x600mm) pieces, ideal if you just desire to attempt out a small amount commencement.
Some other plastic, styrene, is too available in sheet form but much thinner (downwardly to 0.25mm) and is as well frequently more suitable than card for slender cutting-outs just is denser and harder to cut than the foamed Pvc. Both volition allow a certain amount of bending. They are both used extensively in architectural model-making in identify of carte or wood and are obtainable either from specialist model-making shops such as 4D modelshop or suppliers of plastics (such equally Abplas in London).
Gluing
Superglue works very well on both plastics for a quick, strong bond only working with superglue is a practised art because in that location is no time for repositioning before the glue takes. An alternative when working with these plastics (also by and large a much cleaner one) is to use a plastic solvent such as 'Plastic Weld'. Different from the usual gluing process, the pieces to exist glued have to be set up firmly in position first and the solvent is and so brushed into the join. Only a little is needed, which is fatigued into the joint by 'capillary action'. There it melts the plastic surfaces and effectively fuses the two pieces
of plastic together. Any excess solvent outside the articulation quickly evaporates resulting in a very make clean joint. 'Plastic Weld' (as with other brands of dichloromethane solvent) works best on styrene plastics but in tests I plant that information technology did work on the foamed Pvc though it took longer to set. If this doesn't take, the 'gluing from exterior' method will work just every bit easily with thin superglue.
For more information on working with Palight foamed Pvc together with illustrative examples click on 'Palight' brand foamed Pvc nether 'constructing' in the Materials section.
I maintain an up-to-date record of the best or most convenient places to get these special materials in Updated sources/prices of specific materials which can be plant in the Suppliers department.

Source: https://davidneat.wordpress.com/tag/how-to-bend-foam-board/
Posted by: stewartdold1979.blogspot.com
0 Response to "How To Draw On Foam Board"
Post a Comment